
Japanese Folded Patchwork just happens to be one of my favourite techniques. It’s right up there with making hexagons. So I thought I’d show you how I approach the task. Keep in mind that others may do it a little different.
I’ll start by giving you the template dimensions; I’m aiming for 4-1/2” block. I have cut out two circle templates. The measurements are for the diameter. The first template measures 6-7/8” but 7” is near enough if that’s easier for you to produce; and you will use this for tracing the circle onto your outer fabric. The second template measure 6-1/4”, this template is the sewing template. And finally the square of fabric and wadding should measure 4-1/4”. I use a rotary cutter to cut the fabric and then lay the fabric on top of wadding scraps and trim it with scissors.
When I make a Japanese Folded Patchwork I use two colours; one for the outer circle and one for the centre square. So here is the method I use when working on Japanese Folded Patchwork Blocks.
First I take my larger circle template and trace it onto the outer fabric. Then cut on the traced line.

Now using a doubled up thread with a knot in the end I sew a running stitch a scant 1/8” from the edge all the way around. DO NOT SECURE AND CUT THE THREAD YET.

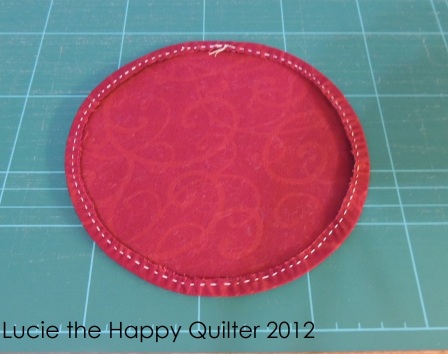
Place the fabric circle on the table. Now lay the smaller circle template in the centre and hold it down with one hand and pull the needle and thread like a drawstring until the fabric fit snuggly around the cardboard template. Now secure the thread in place and cut. This is the same method I use to make really good circles for applique purposes.

The next steps is to press the circle on both sides. Let it cool. Gently remove the template. Press again on both sides carefully. This second pressing gives the circle a good crisp edge to work with.
Now it’s time to add the centre square. Layer one fabric square over one wadding square and centre them both in the middle of the wrong side of the circle. Now you simply fold the circle edges over the sides of the square and pin in place. Make sure that everything looks even on all sides. You can measure up with your squaring up ruler to make sure it’s square.
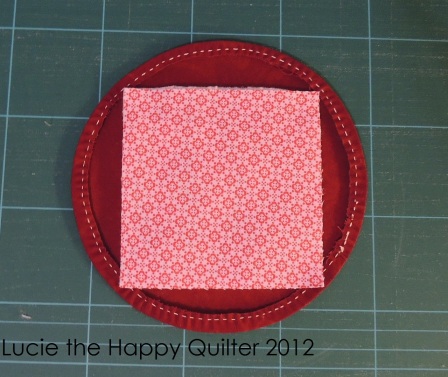

Now we stitch everything in place. That’s pretty simple. You can either use a matching thread or a contrasting thread depending on whether you want the stitching to show up or blend in. My preference is a thread that blends in but for these photos I have used a contrasting thread. When stitching, make an effort to stitch thru all the layers right thru to the back so the stitches will show front and back. This will assure that nothing moves and your block will keep its square shape.


Once you have pieced all your blocks they are sewn together to produce your project. I recommend you sew carefully making very small stitches.

Over the years I have pieced a couple of bags using his technique but you could make placemats, table runners, quilts, sewing machine dust covers and a whole range of things. Let your imagination run wild. And let me know how you get on.
I hope this little tutorial helps.
Happy stitching.
Lucie the Happy Quilter X

December 15, 2012 at 11:42 pm
Great tutorial Lucie. Thanks!
January 12, 2013 at 1:08 pm
Wonderful tutorial – thank you for taking the time to share.
January 12, 2013 at 1:16 pm
Thank you for popping in for a visit.
March 29, 2013 at 8:04 am
very helpful thankyou ….
May 23, 2013 at 12:23 pm
Just love your tutorial, can’t wait to try this, many thanks.
May 23, 2013 at 12:36 pm
Hiya Rena,
I’m glad my Japanese Folded Patchwork tutorial has been of some use to you. Thanks for popping in.
July 8, 2013 at 6:02 am
Reblogged this on Lucie The Happy Quilter's Blog.
August 9, 2013 at 3:40 pm
Thanks for the clear and precise instructions Lucie.
August 9, 2013 at 4:37 pm
I’m glad my instructions were helpful.
September 30, 2013 at 12:18 am
I so appreciate this tutorial. Someone pinned this but called it a Japanese Kaleidoscope block but did not include instructions. I tried doing a google search, checked to see if there was a book without any luck. So I finally tried Japanese folded patchwork which lead me to you pin. Your instructions are wonderful and easy to understand. I do plan on making some since I always like to have a project that I can do by hand. Thank you for taking the time to do this.
September 30, 2013 at 5:08 am
I’m glad I could help. Thanks for popping in.
August 25, 2020 at 10:51 pm
Lucie,
Thank you for your tutorial! When you are stitching the flaps down to the square, are you quilting it (making stitches all the way to the back of the circle) our just stitching the flap to the square fabric and batting?
August 26, 2020 at 6:34 am
Hi Amanda, yes I stitch right thru all the layers which counts as quilting. Thanks for popping in x
February 15, 2014 at 6:05 am
We are doing this technique in class next week.You have made it look so easy.Thanks for sharing
February 15, 2014 at 6:19 am
You’re very welcome Cathy. I’m glad to help.
March 23, 2014 at 7:39 pm
Thank you very much for the the patteren I am dieing to have a go at it now
March 23, 2014 at 7:42 pm
Hiya Valerie
Please send me a progress photo when you do try it out. Thanks for popping in.
August 14, 2014 at 1:09 pm
Thanks for your clear instructions, but do you use the over stitch to sew the patches together? I am planning to make small quilts for a local charity.
August 14, 2014 at 1:24 pm
With right sides together I over sew very small stitches using matching thread. The stitches disappear neatly. It’s a really fun technique. Thanks for popping in Rae.
August 14, 2014 at 1:28 pm
I look forward to starting the quilt. I love hand sewing, so this is just up my street!! Thanks for getting back to me so quickly. Rae
October 5, 2014 at 5:18 pm
I have retired to France and thanks to new friends have just ‘found’ patchwork and applique! As a beginner I would like to thank you for your clear instructions – can’t wait to try this technique!!
October 5, 2014 at 5:53 pm
I’m glad I could help you Jean. Thanks for popping in today.
October 12, 2014 at 6:55 am
At last an easy to follow explanation of Japanese quilting.
Thank you so much.
October 12, 2014 at 7:32 am
I’m glad I could be of help Jennie. Thanks for popping in.
October 14, 2014 at 3:27 pm
Do you know of a Japanese folde quilt block which produces ‘Pin Wheels’ on one side, please
October 14, 2014 at 6:30 pm
I think the pattern you’re looking for is in a book called Japanese Folded Patchwork by Mary Clare Clark isbn 1-903975-51-4. I hope this helps. Thanks for popping in.
September 3, 2015 at 5:25 am
Hi have you ever quilted in the shape if so what did you use I am making a quilt top & finding it needs some quilting
September 3, 2015 at 10:06 am
Vikki, I was simply used whatever hand quilting thread you are used to using. However if you feel a bit more adventurous try a couple of strands of embroidery cotton. It gives the look of sashiko thread. And just quilt a simple shape because quite often less is best. Thank for popping in today.
November 18, 2015 at 8:09 pm
Hi Lucie – thanks for the great instructions. However, I am struggling getting a nice even square. My circle cotton seems perhaps a little thick. Is it better to use quite a thin cotton? I am a beginner quilter so still finding out about different fabrics and which ones are good for patchwork. Any advice to offer?
November 18, 2015 at 10:08 pm
By cotton I assume you mean wadding? If so an 80/20 blend works quite well for Japanese Folded Patchwork. 80/20 means 80% cotton + 20% polyester. It nice and light and is very good for hand sewing. I hope this helps Claire.
April 13, 2016 at 12:47 pm
How many squares do I need foe a double quilt please
April 13, 2016 at 12:57 pm
I suppose that all depends on how big you’ll be making your Japanese Folded Patchwork blocks. My favourite size is 4″. And I suppose I would aim for 76″ square for a double bed quilt. So you would need to make 361 blocks. I hope this helps. Good luck and enjoy the journey.
April 15, 2016 at 1:53 am
This block is so simple and looks great.I have discovered that you can join two together easily by sewing the team’s together on the sewing machine before you fold the flaps over and hand stitch, it gives a really neat finish. Thank you for sharing this.I will use it in a quilt I intend to make
April 15, 2016 at 5:39 am
Hiya Margaret, I’m pleased you found this little tutorial useful. Thanks for popping in.
March 15, 2017 at 10:09 am
I needed a fresher on how I did it years ago!! Found your tutorial just want I required. THANKS
February 18, 2018 at 5:58 pm
I have lots of small squares of Japanese fabrics that would look good in this little frame. Thanks for the information
March 30, 2018 at 4:25 pm
Thanks for the tutorial, just completed a practise piece, I now have a new skill. Diolch the fawr.